• Skip to primary navigation
  • Skip to main content
  • Skip to primary sidebar
OklaRoots

OklaRoots

Dream. Motivate. Create.

  • Video Tutorials
  • Shop OklaRoots!
  • Pattern Vault
    • All Free Patterns
    • Quilts
      • Block Party!
      • Free Quilt Patterns
      • Binding Calculator and Tutorial
      • Delilah BOM Tips
  • Blog
    • Running
    • Weekly Roundup
    • Favorite Bag Making Tools
    • Favorite Quilt Making Tools
    • Small Business Series
  • Subscribe
  • About Jess
    • OklaRoots Spreadshirt
    • Drop a line!
  • Pattern Poll

Boxy Bag pattern additions

Bags, Tutorials - Aug. 06, 2017 - Jessica OklaRoots

The next bag I have been testing out is the Boxy Bag. This is a very popular bag pattern, especially for us beginners. After reviewing a few tutorials, I decided to follow Kelby at kelbysews. She has done such a wonderful job of showing you every single step of the process in her tutorial.

More...

I don't believe in re-inventing the wheel, so if you want all the ins and outs of this bag pattern, please go to her page and check it out.  I couldn't write it better.

BUT!  I did want to test a few additions/alterations.

  1. I love the look of the two tone pouches. Top half one print, bottom half a different print, wrapping around oh-so-neatly. I haven't seen a tutorial with the calculations to accomplish this.  Let's figure it out!
  2. I don't "love" the look of the seams on the inside of the bag.  Could we make some adjustments to hide those??
  3. POCKETS!  I love them. A lot. But instead of adding a pocket to the lining with a topstitch like we did in the Petal Pouch trial, let's add an inserted pocket.... WITH A ZIPPER. Hold me back! I've lost it.

​So let's do this!

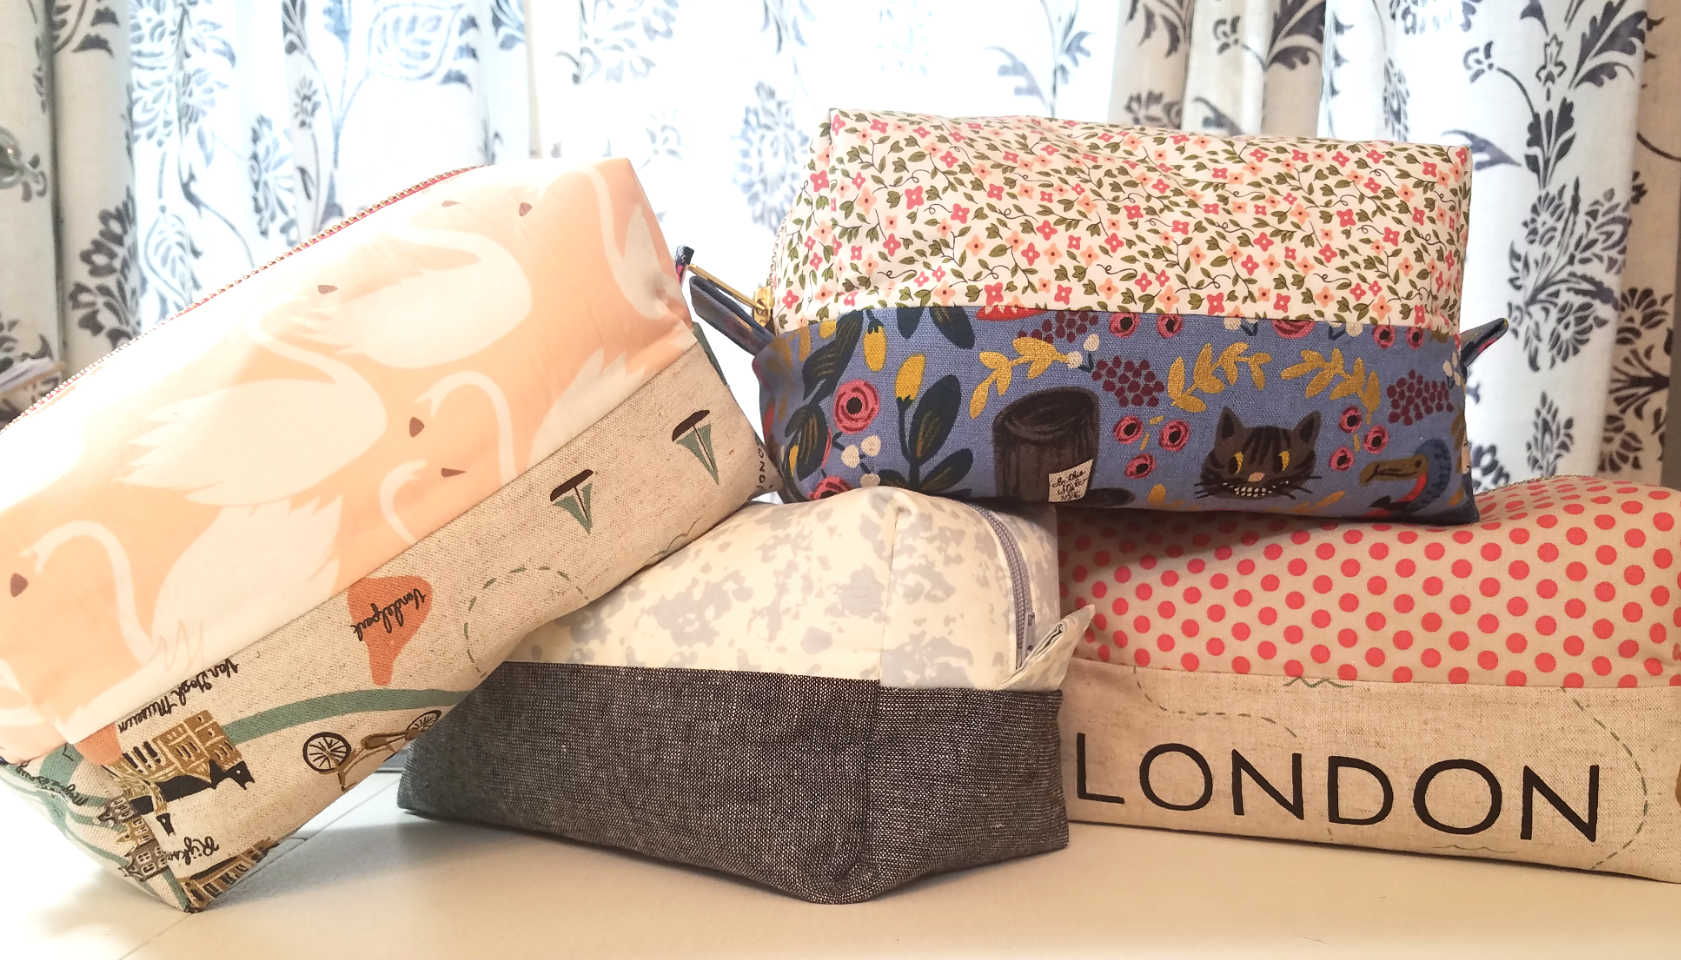
Trial 1 : Two Tone Boxy Bag​

This is the easiest modification to the pattern.  In the pattern provided by kelbysews, this step would take place under the Required field.   To achieve the two tone look, with the bottom half wrapping around the sides you will need to adjust the measurements and cutting instructions for the exterior fabric panel. 

Keep the width of the desired bag the same for all three sections.

For the bottom half of the boxy pouch, divide your desired total length by 2, and then add 0.5 inch.

For the top 2 portions, divide the desired total length by 4, and then add 0.25 inches to each panel.​

 Here is a calculator to assist with determining measurements:

Custom Cut Calculator
Desired Length (inches): Desired Width (inches):
Cut Length Width
Top 1
Top 2
Bottom

Using a quarter inch seam allowance, sew one of the top portions to the top of the base fabric and the other top portion to the bottom of the base. ​

Your exterior panel should now measure the same as your lining (assuming your lining panel is one continuous piece of fabric).  You can now iron on the interfacing and continue with the pattern as normal. ​

Besides offering a unique look to the bag, this alteration also allows you to use quilting cotton fabrics without sacrificing the overall structure. For example, I like to use a heavier fabric like canvas or cork on the base portion.  This helps keep the bottom of the bag firm and stand upright.  I can then use a fun print quilting cotton for the top portions.  Fun and functional! ​

Conclusion: SUCCESS! 


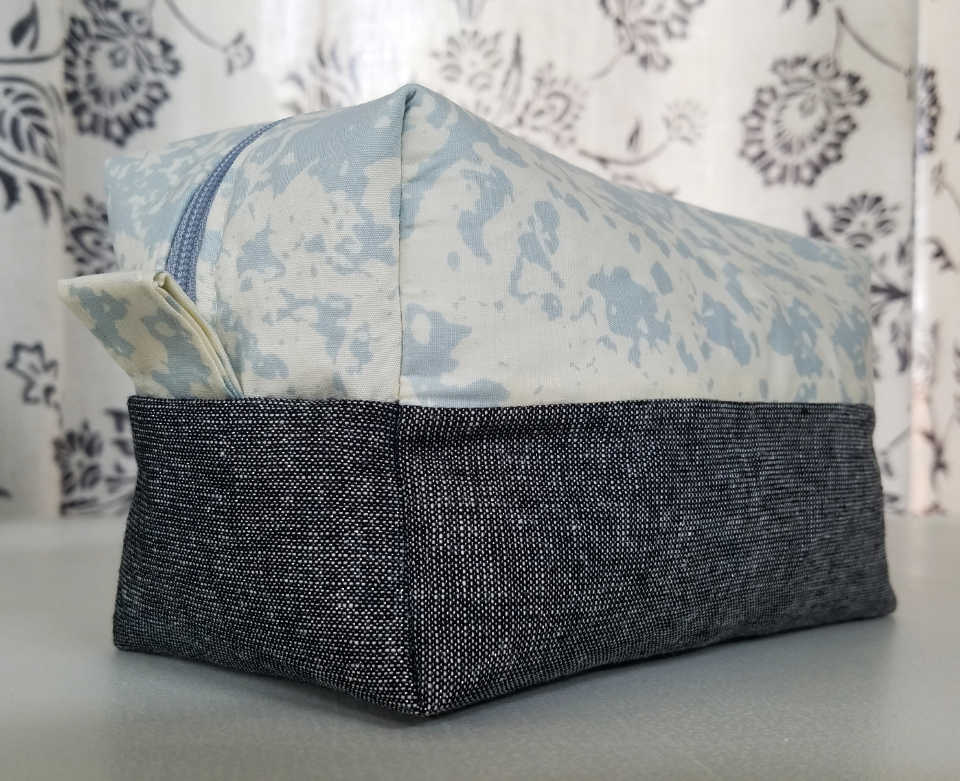
Trial 2 : Hide those seams

Pink Stitches offers a tutorial on accomplishing this by cutting the outer fabric and lining fabric in half.  This creates a seam running down the bottom of the outer panel of the bag.  My goal was to keep the outer fabric as one continuous piece.  The reason being, when you cut it in half and have a seam running along the bottom, you get a "booty" effect.  This can be cute, but one of the characteristics of this bag that I like most is it's firm, flat bottom (that is the only time you will ever here me refer to a "firm, flat bottom").

First adjustment takes place in the Required section of the pattern, adjusting the size of the lining panel.  The width of your lining will stay the same.  Divide your desired total length by 2 and add 0.25 inch to each panel.

You should now have 2 pieces of fabric for the lining.

The next adjustment to the pattern occurs when you are creating your "zipper sandwich". The key is to not sew the exterior and lining fabrics all the way to the ends of the zipper.  You need to start and end your stitches 1/2" to 5/8" from each end of the zipper.  Trust me, this will help in later steps.
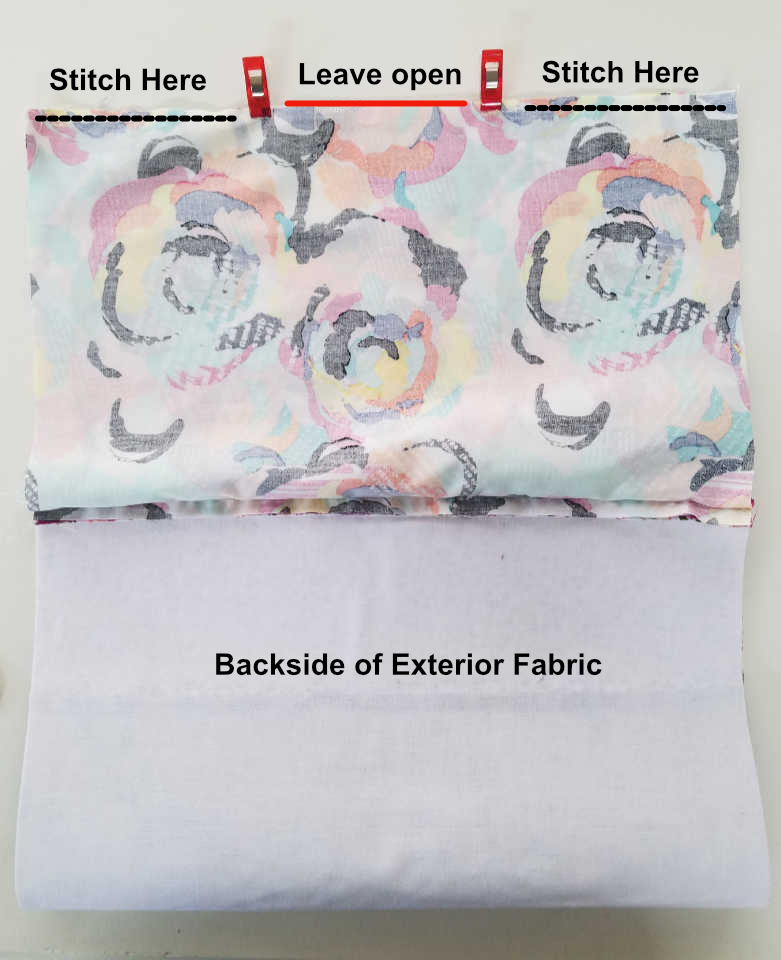
​

​

Once you ​have sandwiched both sides of the zipper and completed the top stitch it is time to combine the two sections of the lining. 

​

Leave 3-4 inches open in the middle of the lining, making sure to back stitch on both sides of the opening. Stitch together the rest of the bottom portion, using 1/4 inch seam allowance.​

​

Now it is time to stitch the sides and add the tabs. I will briefly go over the next few steps, but for an in depth tutorial please visit Pink Stitches Boxy Bag tutorial.

​

​

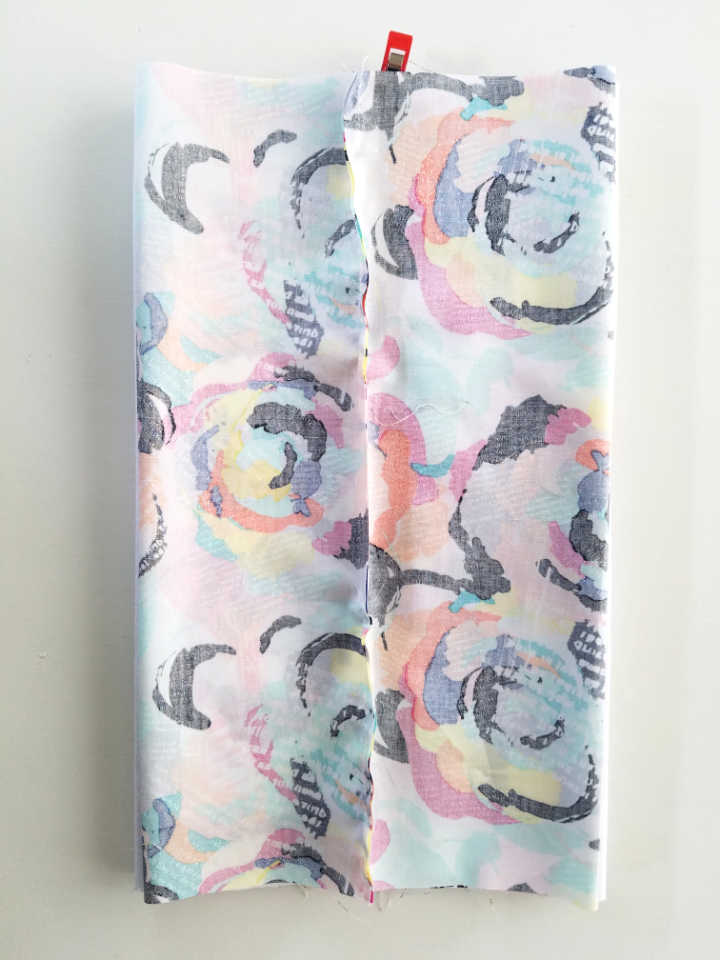
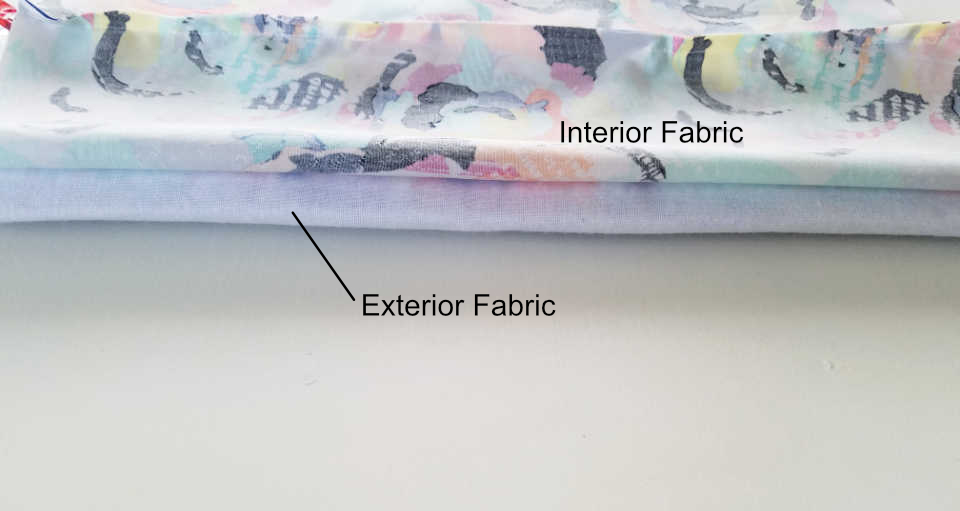
Make sure to create two flattened sections, one using the lining fabric (on top) and the other using your exterior fabric (bottom) with the zipper running along the middle in between.

​

​

​

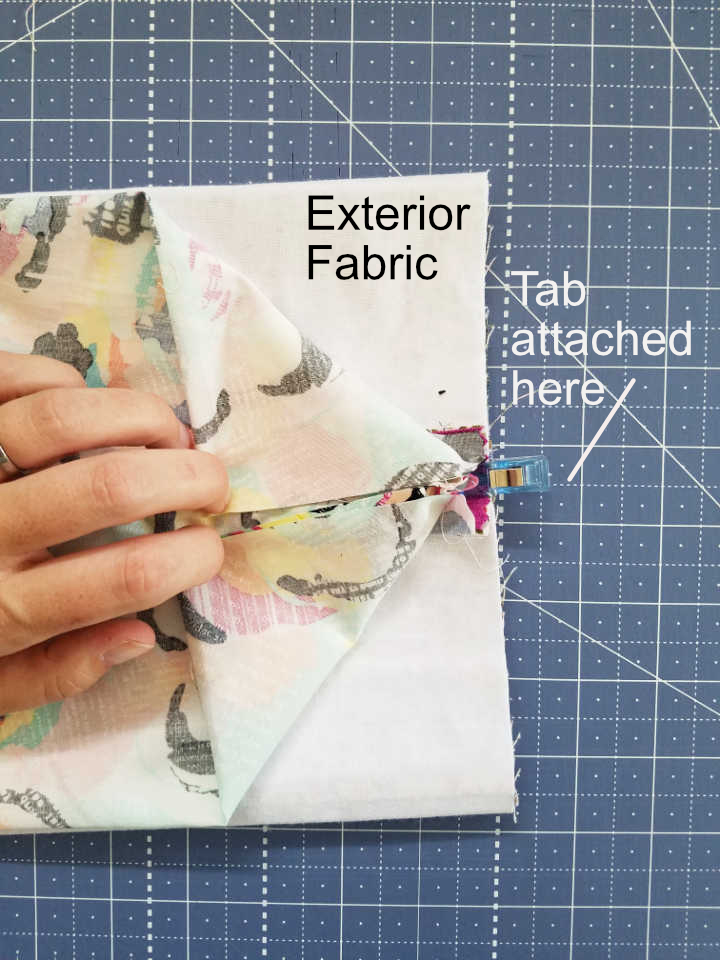
Pin the tabs in between the two layers of exterior fabric (the lining fabric will not be sewn to the tabs). ​

​

Fold the lining fabric back like shown, and sew 1/2" - 5/8" seam allowance along the side of the pouch. Do this to both sides of the exterior panel.

​

Cut the seam allowance down to 1/4".

​

Flip the pouch over, pin back the sides of the exterior panel, and sew 1/2"-5/8" seam allowance along the sides of the interior fabric. Do this to both sides, trimming the same allowance down to 1/4" once complete.

​

​

​

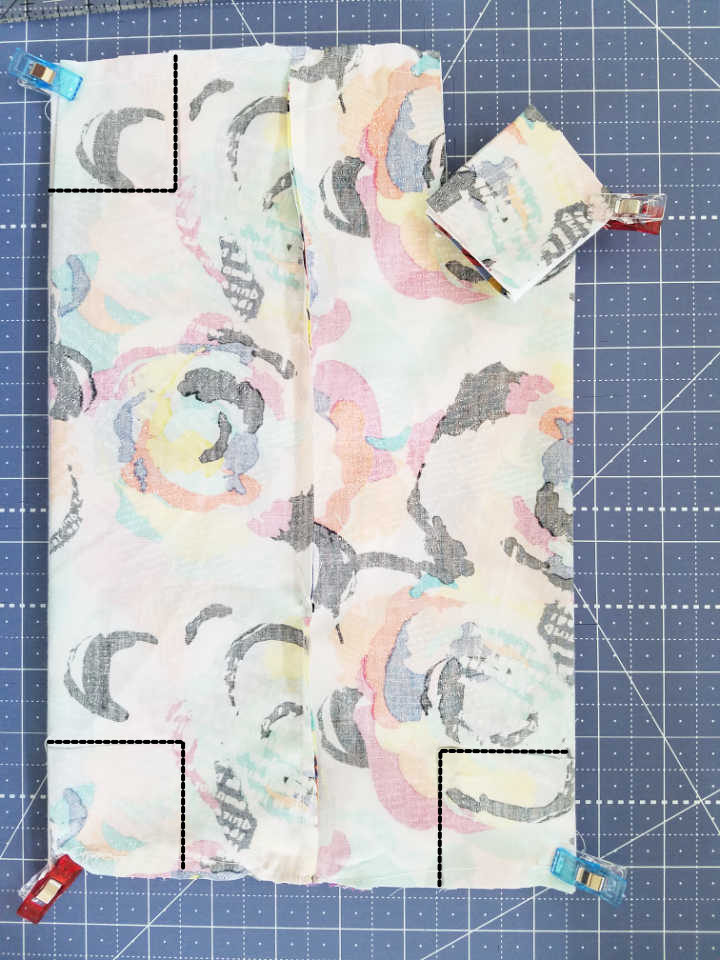
These next few steps proved to be the most difficult for me. ​You will need to cut your corners from both the exterior fabric and the lining fabric.  That is 8 corners you will need to cut. I stacked the folded lining on top of the exterior panel and cut 2 corners at once. 

Fold the corners and zigzag stitch per the Boxy Bag pattern instructions.

Once all corners have been stitched closed, flip the entire bag through the opening you left in the lining seam. If you didn't back stitch the edges of the opening I expect some angry words will be yelled here.

Close the lining seam using your preferred method (I use a quick top stitch on my machine) and pop the lining in the bag, poking out all the corners.

This method gives the interior of the bag a clean look. However, it also weakens the overall strength of the bag.  While I am not a fan of visible seams inside the bag, I don't feel they are noticeable enough to warrant the extra work this involves.  Personally, I will be avoiding this alteration for the majority of my boxy bags.​

Conclusion: Can be done... weakens the strength of the structure.... My opinion: NOT worth the extra effort.


Trial 3: Interior zipper pocket

I. Love. Pockets.  

Big pockets, little pockets, flamboyant pockets, secret pockets.... I love pockets! They are just so dang useful.

I explained how to stitch a pocket on top of fabric in my Petal Pouch Alteration tutorial, but I really wanted to incorporate a zipper this time. 

This step will take place in the Required phase of Kelsy's tutorial. 

Please access Professor Pincushion's YouTube video for a video instruction of this method. 

My panels are 13.5"x17", so I made my pocket 6"x6" using a 4" zipper (I had to cut my zipper). Cut your pocket to desired size and adhere interfacing (I used one layer of Pellon SF-101).

Below is a diagram explaining where to draw your pocket opening. 

​

​

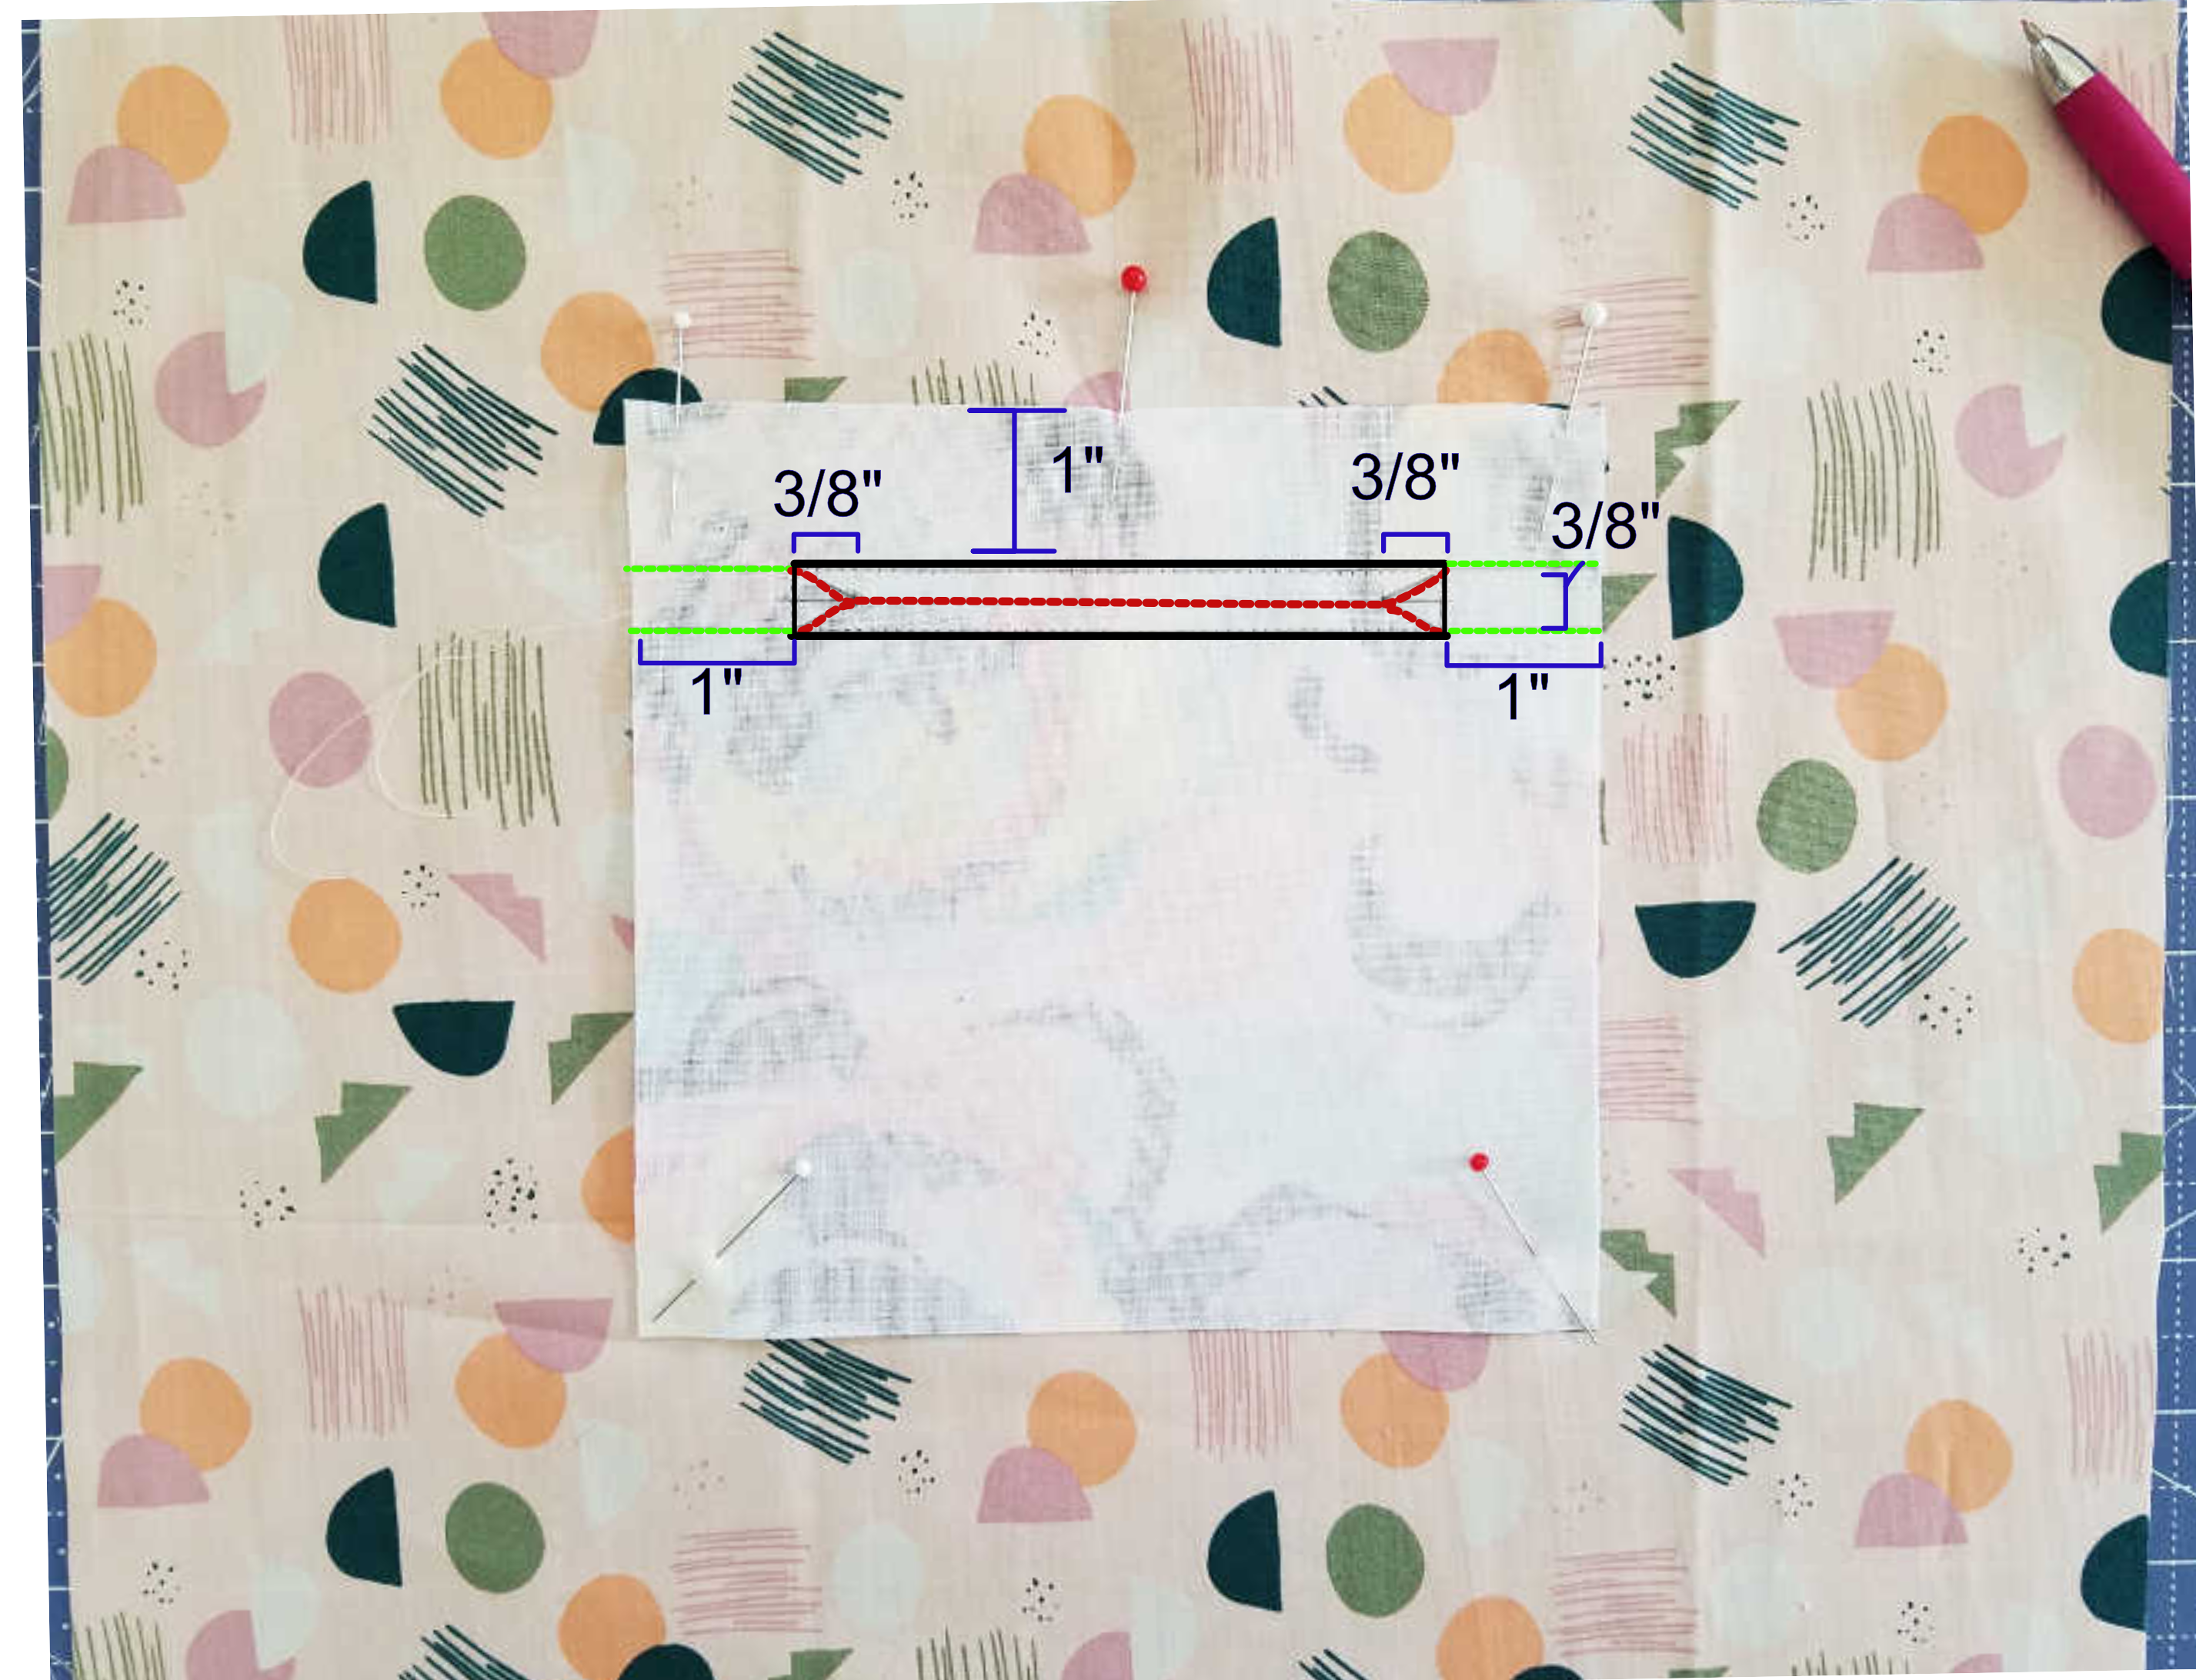
I decided to place my pocket in the center of the panel, 2.5" down from the top. Right sides together, pin your pocket to the interior fabric panel, making sure to place it in the desired location. You will now draw your cut lines on the back of the interfacing.

Draw the green, black and red lines on the back of your interfacing, following the measurements in the diagram.

First, sew along the black lines. Then, cut along the red lines.

Under stitch around the pocket opening, sewing the seam allowance to the pocket.  Fold the top piece of the pocket down, and sew, making sure to pull the pocket slit open slightly. ​

​After under stitching, push the pocket piece through the hole. Press open.
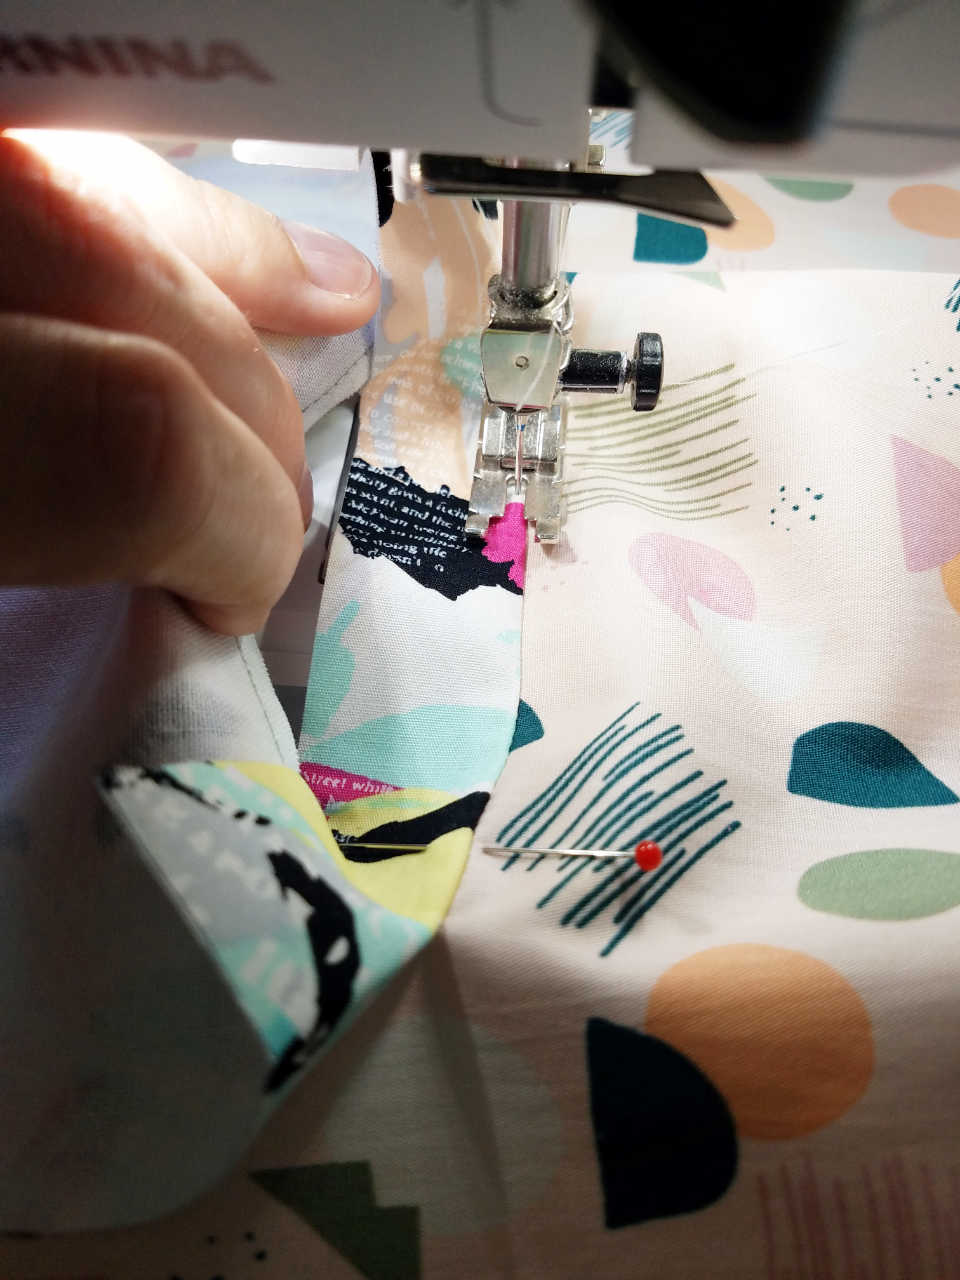
With the rig​ht side of the interior lining facing up, place the zipper right side up on the back of the lining.  You should be looking at the lining face up, with the zipper showing through the pocket hole. Top stitch around the perimeter of the hole, attaching the zipper in place.

​Last step is closing the 3 sides of the pocket! Fold the bottom (larger) portion of the pocket up to the top, right sides together.  Now sew along the 3 open sides.

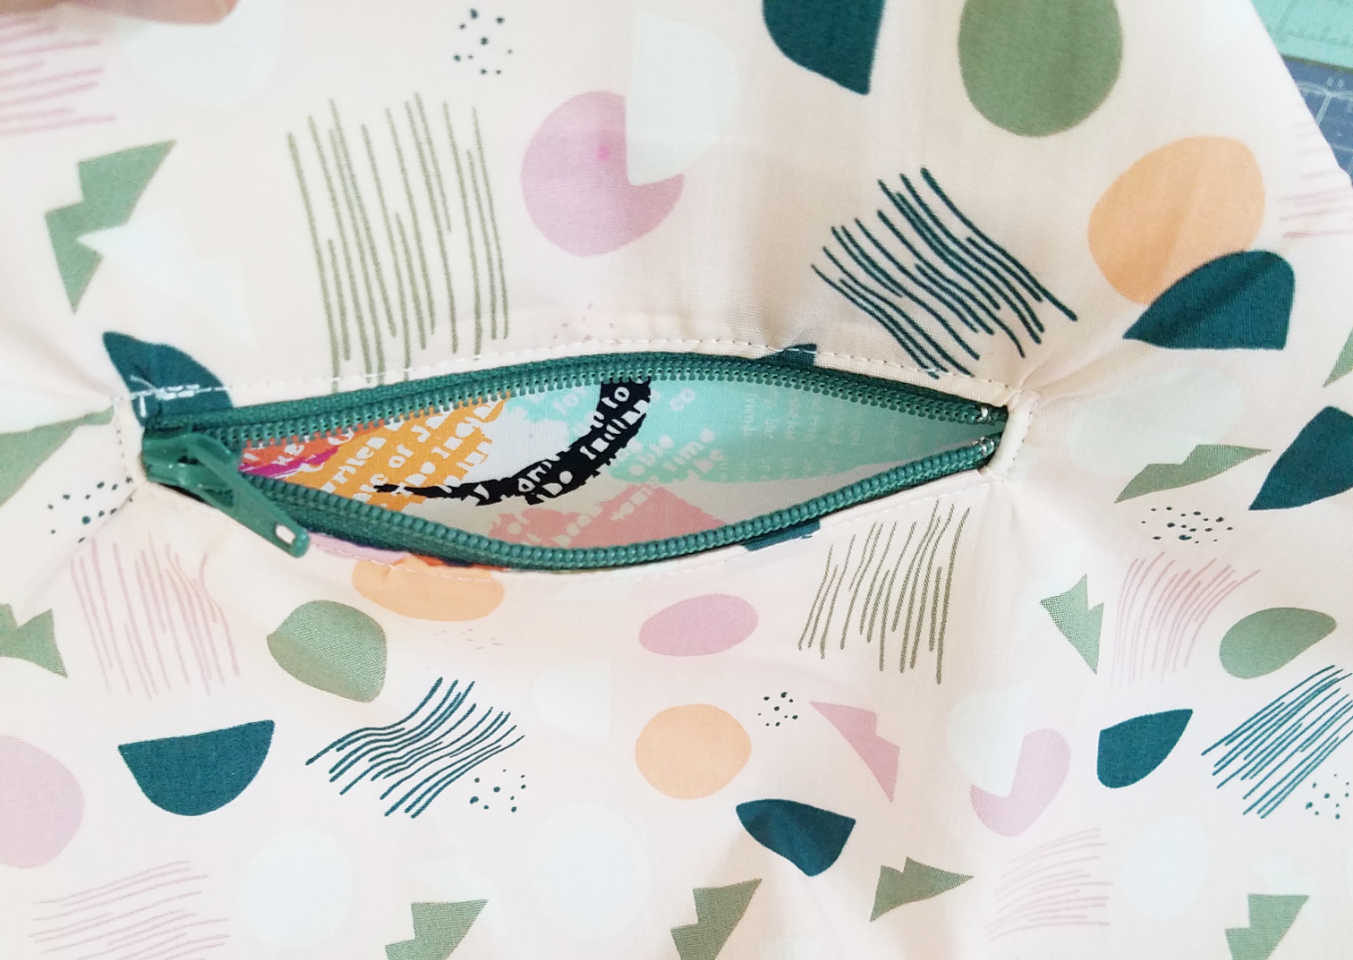
And that's it! You can now continue with the pattern using the interior lining as normal. ​

This step does take a few extra steps, but it isn't nearly as difficult as I thought it would be. I highly suggest watching the YouTube tutorial by Professor Pincushion.  She provides much more detailed steps than what I have highlighted here.

I use my Boxy Bags for storing sewing supplies when traveling, and this pocket is perfect for holding packs of needles and stick on thimbles. I also think it is a good update to the bag if you are planning on selling them.  Because, again, WHO DOESN'T LOVE POCKETS?!

Conclusion: SUCCESS! But may take some more practice.


Advertisement
← Previous Post
Trying out the Noodlehead Petal Pouch
Next Post →
Binding Calculator and Tutorial

You may also like

2025 ByAnnie SewPINK Blog Hop – Making The Zip It Up 2.0
2024 ByAnnie #SewPink Breast Cancer Awareness
OklaRoots First Mystery Box!

Reader Interactions

Comments

  1. Sara says

    November 26, 2021 at 9:16 pm

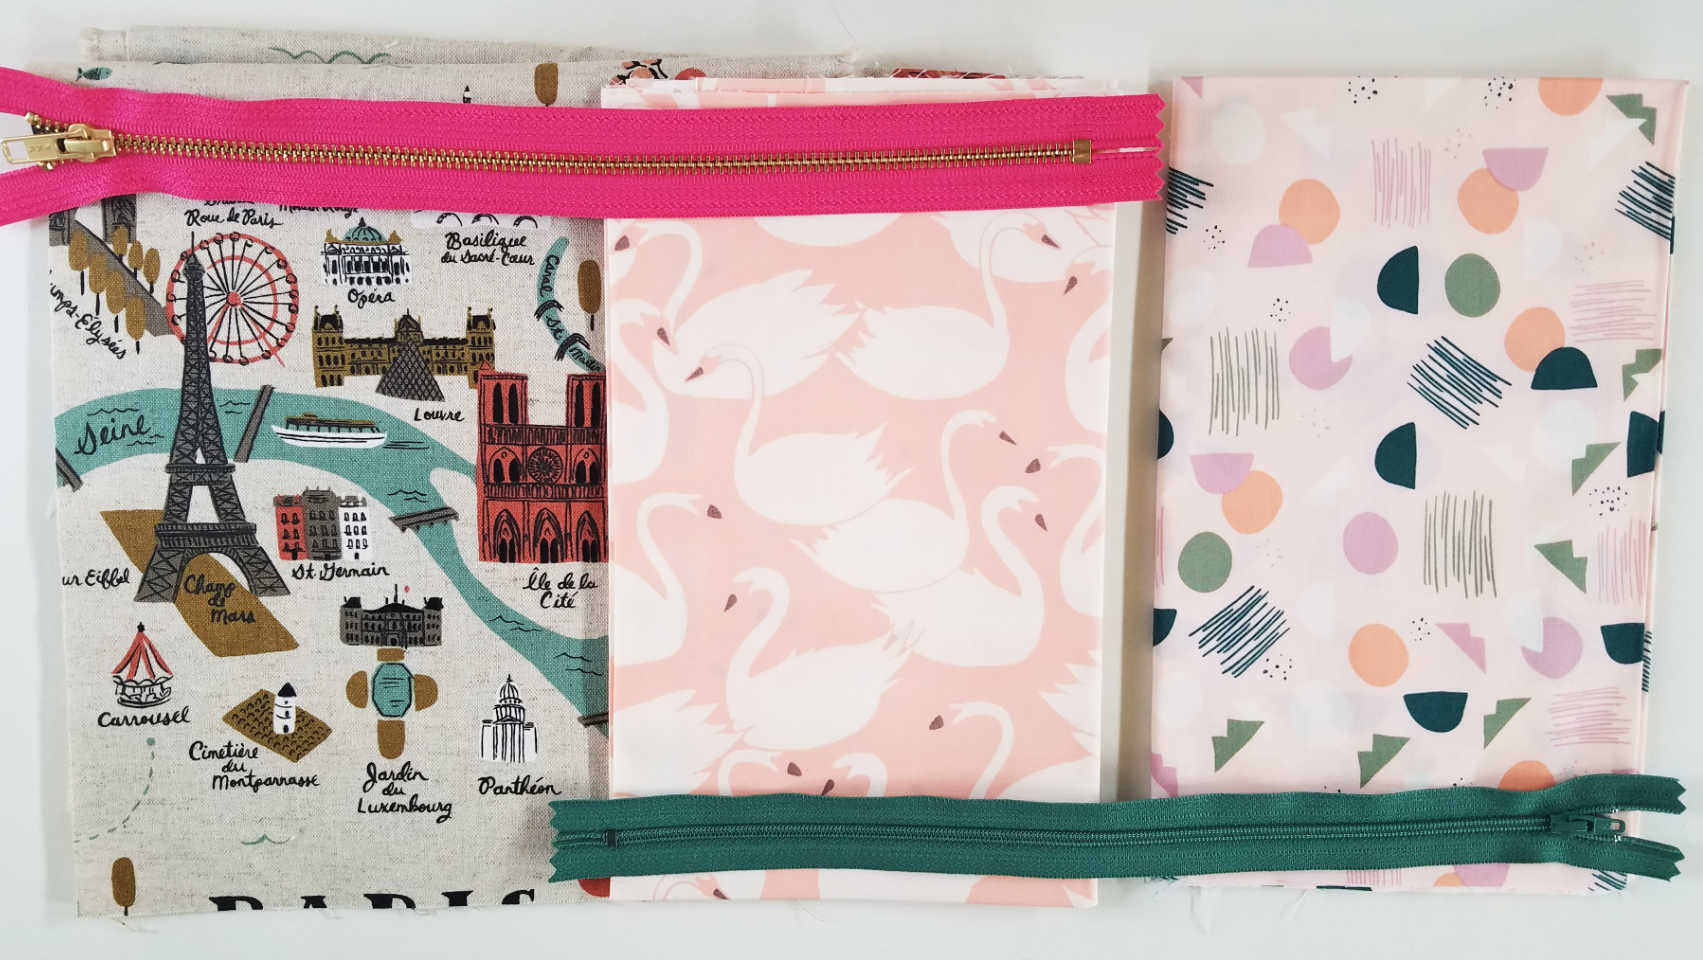
    I LOVE the Paris map fabric in the Trials 3 photo–what is the manufacturer?

    Reply
  2. Joanna says

    February 22, 2022 at 1:26 pm

    Jess, Your tutorial are fantastic, and this one – on youtube and here, extremely friendly – gonna try this one in the evening 🙂 I am your fan! See U on YT

    Reply
  3. Elizabeth says

    October 5, 2022 at 2:03 am

    The link to the original tutorial is no longer valid. I used the Wayback Machine to get a link that works https://web.archive.org/web/20190110180732/http://www.kelbysews.com/2014/03/boxy-bag-tutorial.html
    Feel free to use this to replace the link that’s there.

    Reply

Leave a Reply Cancel reply

Your email address will not be published. Required fields are marked *

Primary Sidebar

Recent Posts

  • 2025 ByAnnie SewPINK Blog Hop – Making The Zip It Up 2.0
  • 2026 OklaCruise!
  • January 2025 Livestream
  • 2024 ByAnnie #SewPink Breast Cancer Awareness
  • Itty Bitty Boxy Bag Templates – How To Use

Instagram

oklaroots

Time for Giveaway Bundle Number 6! This box has Time for Giveaway Bundle Number 6! 

This box has SO many fun goodies! It was hard to get it all in one photo. I do need to note, however, that the large clear template in the very back unfortunately broke, so it will not be included. 

To enter this giveaway answer the following question: 

Name a pattern or design (bag or quilt) that you would suggest for someone who is just starting out sewing. Something easy yet satisfying to get them into this craft. 

For me, I always recommend the Itty Bitty Boxy Bag. Yes, I know it's my own pattern, but that little stinker is CUTE and quick. The perfect gateway bag to our world 😉. 

The Rules:
Giveaway ends on February 5th at 11:59pm eastern. Open worldwide, I will cover shipping costs. However, if the winner is outside the US you may have associated fees due upon receipt. This is not sponsored or associated with anyone but OklaRoots.
The winner will be contacted directly by me, OklaRoots, in a direct message AND their name will be announced and tagged to this post. Please don’t fall for the scammers and their scammy tricks!
This post is available on both Facebook and Instagram. Winner must be following the OklaRoots account on the platform they submit their response.
Items come from a dog, cat and bird friendly home.
This week’s tutorial is for a wallet that MUST be This week’s tutorial is for a wallet that MUST be made more than once. The adorable Brooke Bifold from @lindshandmade is addictive!

It’s the perfect size for quick trips, kiddos, travel and gifting. And it’s so much fun to mix and match vinyl scraps, coming up with a new look each time.

This is also the Jan/Feb Bag Making Babe Box, which I’m referring to as the Bestie Box! You’ll have everything you need to make two coordinating Brooke wallets. Perfect for Galentine’s Day! 

Have a great week friends!

#oklarootstuts #lindshandmadedesigns #bagmakingbeesclub #wallet #gift
Congratulations to our winner @jeninok04 ! Don't Congratulations to our winner @jeninok04 !

Don't you worry, I haven't forgotten about our giveaway palooza... and we're now on to Bundle 5!

Ok, easy question to answer for this:

What sewing project are you currently working on? Or if you're in between projects, what's next? A bag? A quilt? Let us know! And if you can tell us the designer and/or pattern name that would be great too. Let's all build a list of fun projects to work on this winter.

I just finished a Totes Cute Tote today and my next project is an easy wallet. It's a custom pattern (by yours truly) that will hopefully come together as planned and can be shared with everyone soon. 

The Rules:
Giveaway ends on January 29th at 11:59pm eastern. Open worldwide, I will cover shipping costs. However, if the winner is outside the US you may have associated fees due upon receipt. This is not sponsored or associated with anyone but OklaRoots.
The winner will be contacted directly by me, OklaRoots, in a direct message AND their name will be announced and tagged to this post. Please don’t fall for the scammers and their scammy tricks!
This post is available on both Facebook and Instagram. Winner must be following the OklaRoots account on the platform they submit their response.
Items come from a dog, cat and bird friendly home.
This week’s tutorial is going over the adorable Qu This week’s tutorial is going over the adorable Quarry Tote from @noodlehead531 

This cutie is a quick pick-me-up pattern that is a nice break from these cold days. And it would be fantastic as a craft bag!

Hugs to everyone ❤️

#oklarootstuts #noodleheadpatterns #handmade
Winter… I’m done with you. Time for spring 🌸 In Winter… I’m done with you. 

Time for spring 🌸

Instructions for the lined version of the Totes Cute Tote coming soon!

Have a good weekend friends. Stay warm ❤️
This week we’re making the Owen Organizer from @uh This week we’re making the Owen Organizer from @uhohcreations ! 

This firm tote can be used for SO MANY THINGS! The car, the playroom, the beach…

Help me test something out, if you can please. Comment Owen below for a link to this tutorial. And let me know if it works❤️

Have a good week!

#oklarootstuts #handmade #tote #grocerybag
Thank you so much to everyone who offered question Thank you so much to everyone who offered question suggestions for these remaining giveaway bundles!

Let's get to Bundle 4!

To enter this giveaway, answer the following question in the comments: 

Do you have a non sewing tool that you use while sewing? For example, are you using a butter knife to smooth out corners? Tongs to birth bags? Let me know the oddest tool you use when sewing! If you are a sewing-tool purist, then what is a tool you have that might look different than what it's for?

Most of us are very familiar with a stiletto, but when a non-sewer walks in my room that is a tool that often scares them. I mean, it could definitely do some damage. And when I drop it on the floor I have the FASTEST feet. No way am I letting that get me.

The Rules:
Giveaway ends on January 20th at 11:59pm eastern. Open worldwide, I will cover shipping costs. However, if the winner is outside the US you may have associated fees due upon receipt. This is not sponsored or associated with anyone but OklaRoots.
The winner will be contacted directly by me, OklaRoots, in a direct message AND their name will be announced and tagged to this post. Please don’t fall for the scammers and their scammy tricks!
This post is available on both Facebook and Instagram. Winner must be following the OklaRoots account on the platform they submit their response.
Items come from a dog, cat and bird friendly home.
Congrats to our winner @quiltchic_75 ! Giveaway B Congrats to our winner @quiltchic_75 !

Giveaway Bundle number 3 is here!

Ok... I'm running out of good questions for these giveaways. So here's my plea:

What is a good question to ask for the rest of the giveaways? 😂 No seriously, any interesting question you can think of, let me have them. No matter how random, just keep it appropriate please 😏 (you know who you are). 

Comment your question suggestion on this post to enter the giveaway!

The Rules:
Giveaway ends on January 16th at 11:59pm eastern. Open worldwide, I will cover shipping costs. However, if the winner is outside the US you may have associated fees due upon receipt. This is not sponsored or associated with anyone but OklaRoots.
The winner will be contacted directly by me, OklaRoots, in a direct message AND their name will be announced and tagged to this post. Please don’t fall for the scammers and their scammy tricks!
This post is available on both Facebook and Instagram. Winner must be following the OklaRoots account on the platform they submit their response.
Items come from a dog, cat and bird friendly home.
This bag is SO INCREDIBLE! The Hellcat Crossbody This bag is SO INCREDIBLE! 

The Hellcat Crossbody from @the.crafty.reporter is such a fun one to make. Not only is it enjoyable, it’s also a pattern that will teach you SO much.

I’ll be honest, I avoid piping 😬 I’ve tried so many different types and it’s always been difficult and always looked a lil wonky. UNTIL AMBER’S PIPING! The instructions for this were so well written and the bag came together so smoothly, I now have more confidence in this technique.

So if you’re a little intimidated by this technique or this style, give it a try! Take your time, enjoy each step, and have fun making a bag.

Happy Monday friends!

#oklarootstuts #fannypack #handmade #piping #custom
Follow on Instagram

Recent Posts

  • 2025 ByAnnie SewPINK Blog Hop – Making The Zip It Up 2.0
  • 2026 OklaCruise!
  • January 2025 Livestream
  • 2024 ByAnnie #SewPink Breast Cancer Awareness
  • Itty Bitty Boxy Bag Templates – How To Use

Copyright © 2026 · OklaRoots

Lexi Theme by Code + Coconut